A Beginner’s Guide to Generic Routing Encapsulation

Generic Routing Encapsulation is an extremely basic tunneling protocol, but its simplicity can also cause confusion. The first question firewall engineers ask me when we’re debugging a GRE tunnel: What port number does it use? Like ICMP, GRE has no concept of ports — well, not exactly. In this article, I give an overview of the GRE protocol structure, show you how to build GRE tunnels in Linux, and explain why GRE doesn’t use ports.
The GRE protocol is getting close to 20 years old but continues to be a valuable addition to the network engineer’s tool belt. Part of the attraction is that there is no handshake required to setup a GRE tunnel. Simply encapsulate any packet and send to one or more destinations, whether the destination is expecting the packet or not. It’s a connectionless protocol, like UDP. Send it and forget it.
Another great thing about GRE is that it doesn’t dictate what can be encapsulated. Encapsulate a packet with just its IP header or the entire frame. It’s up to you. When we encapsulate a payload and its IP header, it’s called gretun. When we include the ethernet header too, it’s gretap.
GRE does not encrypt the payload so layer 3 encryption, such as IPsec, is highly recommended but beyond the scope of this article.

So what makes up that GRE header shown in red above? As we can see from the diagram below, there’s not much to it.

The GRE header adds between 4 to 16 bytes of overhead, depending on which fields are used. The Checksum, Key, and Sequence Number header fields are all optional.
The C, K, and S bits respectively indicate whether the Checksum, Key, or Sequence Number fields are present. In practice, the Checksum and Sequence Number fields are rarely used.
The version number field is always zero.
The most interesting header field is the Protocol Type, which indicates the EtherType of the encapsulated packet. In the case of gretun, the EtherType value is 0x0800 for IPv4 or 0x86DD for IPv6. In the case of gretap, the EtherType value is 0x6558.
Finally, we have the optional Key field. Judging by the name, one might think that this is some kind of encryption key but that is not the case. The key provides no security because it would be trivial to snoop the traffic and see what keys are being used on the tunnel. The actual purpose of the key field is somewhat similar to a port number. Its purpose is to distinguish between individual traffic flows on a tunnel, which can then be treated differently, e.g. routed to different destinations. The key exchange mechanism is not defined by the GRE protocol, so keys are generally configured manually on each end of the tunnel. If you don’t have a specific need to use keys then turn them off and save yourself that extra 4 bytes of overhead in every packet.
Creating a gretun tunnel
Let’s go ahead and make a gretun device tun0. We’ll be using an Ubuntu Bionic virtual machine and the iproute2 package, which is included in most Linux distributions.
We’ll start by checking the iproute2 help hints to see the syntax:
ubuntu@host-1:~$ ip tunnel help
Usage: ip tunnel { add | change | del | show | prl | 6rd } [ NAME ]
 [ mode { ipip | gre | sit | isatap | vti } ] [ remote ADDR ] [ local ADDR ]
 [ [i|o]seq ] [ [i|o]key KEY ] [ [i|o]csum ]
 [ prl-default ADDR ] [ prl-nodefault ADDR ] [ prl-delete ADDR ]
 [ 6rd-prefix ADDR ] [ 6rd-relay_prefix ADDR ] [ 6rd-reset ]
 [ ttl TTL ] [ tos TOS ] [ [no]pmtudisc ] [ dev PHYS_DEV ]Where: NAME := STRING
 ADDR := { IP_ADDRESS | any }
 TOS := { STRING | 00..ff | inherit | inherit/STRING | inherit/00..ff }
 TTL := { 1..255 | inherit }
 KEY := { DOTTED_QUAD | NUMBER }
Looks pretty simple. Now let’s create the tunnel device (with no key), assign an IP address to the tunnel interface, and bring the interface up:
ubuntu@host-1:~$ sudo ip tunnel add tun0 mode gre remote 10.131.73.16 local 10.131.73.9 dev eth0
ubuntu@host-1:~$ sudo ip addr add 172.17.0.1/24 dev tun0
ubuntu@host-1:~$ sudo ip link set tun0 up
Here’s what was created (omitting the uninteresting interfaces and IPv6 addresses):
ubuntu@host-1:~$ ip addr show
2: eth0: <BROADCAST,MULTICAST,UP,LOWER_UP> mtu 8976 qdisc fq_codel state UP group default qlen 1000
 link/ether fa:16:3e:6e:fb:b4 brd ff:ff:ff:ff:ff:ff
 inet 10.131.73.9/24 brd 10.131.73.255 scope global dynamic eth0
 valid_lft 81126sec preferred_lft 81126sec
8: tun0@eth0: <POINTOPOINT,NOARP,UP,LOWER_UP> mtu 8952 qdisc noqueue state UNKNOWN group default qlen 1000
 link/gre 10.131.73.9 peer 10.131.73.16
 inet 172.17.0.1/24 scope global tun0
 valid_lft forever preferred_lft forever
Note the MTU size of the tun0 interface: 8952 bytes. It’s 24 bytes less than the physical interface eth0 MTU, 8976 bytes. This makes sense because we’re adding the encapsulating IPv4 header (20 bytes) and a GRE header with none of the optional header fields (4 bytes). If we’d added a key, that MTU would be further reduced by 4 bytes.
Looks good so far. Now let’s create the other side of the tunnel on a second Ubuntu VM:
ubuntu@host-2:~$ sudo ip tunnel add tun0 mode gre remote 10.131.73.9 local 10.131.73.16 dev eth0
ubuntu@host-2:~$ sudo ip addr add 172.17.0.2/24 dev tun0
ubuntu@host-2:~$ sudo ip link set tun0 up
Remember, there’s no handshake in GRE so the order that you bring up the tunnel endpoints is irrelevant. It also means that the tunnel will only ever be in the DOWN or UNKNOWN states. It can never really be UP because a GRE tunnel is stateless.
Going back to our first machine, let’s check the routing table:
ubuntu@host-1:~$ ip route show
default via 10.131.73.1 dev eth0 proto dhcp metric 100
10.131.73.0/24 dev eth0 proto kernel scope link src 10.131.73.9
172.17.0.0/24 dev tun0 proto kernel scope link src 172.17.0.1
Observe above that a route is available to our overlay network via the tun0 interface. Let’s try and use it:
ubuntu@host-1:~$ ping -c3 172.17.0.2
PING 172.17.0.2 (172.17.0.2) 56(84) bytes of data.
64 bytes from 172.17.0.2: icmp_seq=1 ttl=64 time=0.247 ms
64 bytes from 172.17.0.2: icmp_seq=2 ttl=64 time=0.323 ms
64 bytes from 172.17.0.2: icmp_seq=3 ttl=64 time=0.392 ms— — 172.17.0.2 ping statistics — -
3 packets transmitted, 3 received, 0% packet loss, time 2045ms
rtt min/avg/max/mdev = 0.247/0.320/0.392/0.062 ms
It works. We’re able to ping the tunnel interface on the far side of our tunnel.
Here’s a network trace from the above pings with the GRE header expanded:
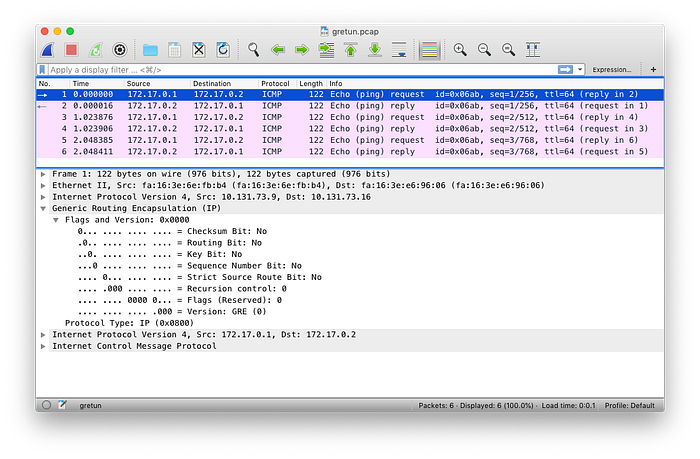
We can see in the trace above the original IP header as well as the encapsulating IP header. Note that all the GRE header fields are zero, with the exception of the Protocol Type, which is set to 0x0800 as we expect for an encapsulated IPv4 packet.
Creating a gretap tunnel
Strangely, to create a gretap device we do not use the ip tunnel command. Instead, the device is created using theip link add command. It would be more intuitive if gretap was simply one of the ip tunnel types but unfortunately that’s not how it is.
Creating the gretap device tun1 on our first VM:
ubuntu@host-1:~$ sudo ip link add tun1 type gretap remote 10.131.73.16 local 10.131.73.9 dev eth0
ubuntu@host-1:~$ sudo ip addr add 172.18.0.1/24 dev tun1
ubuntu@host-1:~$ sudo ip link set tun1 up
```
Checking the result (again showing only the useful information):
ubuntu@host-1:~$ ip addr show
2: eth0: <BROADCAST,MULTICAST,UP,LOWER_UP> mtu 8976 qdisc fq_codel state UP group default qlen 1000
 link/ether fa:16:3e:6e:fb:b4 brd ff:ff:ff:ff:ff:ff
 inet 10.131.73.9/24 brd 10.131.73.255 scope global dynamic eth0
 valid_lft 74616sec preferred_lft 74616sec
11: tun1@eth0: <BROADCAST,MULTICAST,UP,LOWER_UP> mtu 8938 qdisc fq_codel state UNKNOWN group default qlen 1000
 link/ether 76:ac:3f:5d:ea:56 brd ff:ff:ff:ff:ff:ff
 inet 172.18.0.1/24 scope global tun1
 valid_lft forever preferred_lft forever
This time we note that the tunnel MTU, 8938 bytes, is 38 bytes less than the physical interface, 8976 bytes. The reason for this is that we’re now also encapsulating the original ethernet header, which is 14 bytes. Add that to the 20 byte IP header and 4 byte GRE header and this results in the 38 byte lower MTU.
Also strangely, the ip addr show command does not show us the tunnel endpoints like it did with the gretun device. To see this we need to examine the device properties and supply the -d switch, which results in more verbose information being returned:
ubuntu@host-1:~$ ip -d link show tun1
11: tun1@eth0: <BROADCAST,MULTICAST,UP,LOWER_UP> mtu 8938 qdisc fq_codel state UNKNOWN mode DEFAULT group default qlen 1000
 link/ether 76:ac:3f:5d:ea:56 brd ff:ff:ff:ff:ff:ff promiscuity 0
 gretap remote 10.131.73.16 local 10.131.73.9 dev eth0 ttl inherit addrgenmode eui64 numtxqueues 1 numrxqueues 1 gso_max_size 65536 gso_max_segs 65535
Let’s create the far side of the gretap tunnel on our second VM:
ubuntu@host-2:~$ sudo ip link add tun1 type gretap remote 10.131.73.9 local 10.131.73.16 dev eth0
ubuntu@host-2:~$ sudo ip addr add 172.18.0.2/24 dev tun1
ubuntu@host-2:~$ sudo ip link set tun1 up
Back to our first machine, let’s try ping across our layer-2 tunnel:
ubuntu@host-1:~$ ping -c3 172.18.0.2
PING 172.18.0.2 (172.18.0.2) 56(84) bytes of data.
64 bytes from 172.18.0.2: icmp_seq=1 ttl=64 time=0.368 ms
64 bytes from 172.18.0.2: icmp_seq=2 ttl=64 time=0.290 ms
64 bytes from 172.18.0.2: icmp_seq=3 ttl=64 time=0.270 ms — — 172.18.0.2 ping statistics — -
3 packets transmitted, 3 received, 0% packet loss, time 2036ms
rtt min/avg/max/mdev = 0.270/0.309/0.368/0.044 ms
Here’s the network trace from the above pings:
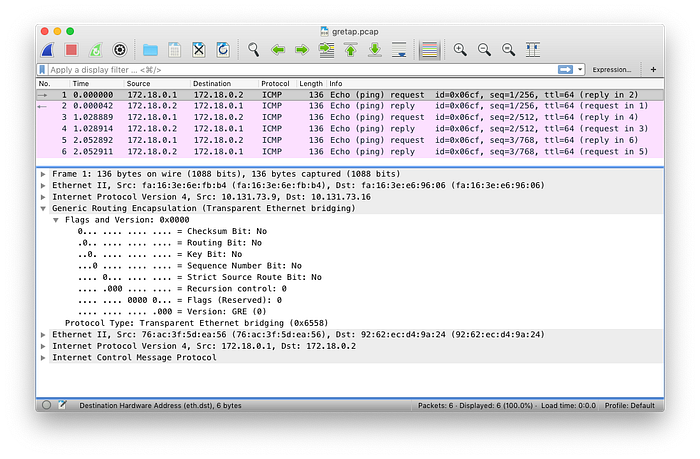
Note that this time we see that the original ethernet header is also encapsulated and that the Protocol Type in the GRE header is now 0x6558.